Saturday, December 6, 2008

Studio Talk: Victor C - Awesomeness!

Ok so I apologize for not blogging for a while- we all know how even the shortest of breaks from life (ahem, Thanksgiving!) mess things up for a few weeks afterward! But I have to share something really freaking awesome with you!! 

Today, I went to Studio Talk at my Nordstrom MAC counter, and the artist there was Victor C. You can learn about him HERE. I had heard only amazing things about him by many of my friends who are makeup artists for MAC, and I had been told he was Missy Elliot's artist, so I was stoked to go and see what I could learn from him. 

Sure enough, when I got there, he verified that he had gone on two tours with Missy, and that he also goes to all sorts of awesome events like ALL the fashion weeks (Milan, LA, NYC, you name it), Sundance, etc. Cool right, but that wasn't even the coolest part- the coolest was that Victor asked me to be his model. I was like UMM HELL YEA! Well okay I didn't say that, but of course I was so freaking happy! 

So anyways, this is the look he did, but here are two things you need to know: A), I was in the hot seat the whole time so I didn't write anything down, and B), I took these photos 5 hours after the event, so it's not as good- plus who said I was ever photogenic anyways? :)

Here are few photos and the rest will be at the bottom:

Photobucket

Photobucket

Photobucket

Photobucket

Photobucket

Photobucket

Ok so Victor:
1) Cleansed my face with MAC wipe.
2) Drenched my face with Fix+ to quench my thirsty skin and kind of evened it out with a 187 brush.
3) Used the Oil Control Lotion to moisturize.
4) Used Strobe Cream with 187 brush to luminize the skin.
5) Patted Eye Cream under my eye.
5) Used Prep + Prime with 187 brush to prime.
6) With 109 brush, buffed Studio Fix Fluid Foundation into skin
7) With 224, buffed Select Moisturecover Concealer under eye areas and any blemishes (this brush is ideal because it is so gentle on the sensitive skin under the eye).
8) With 168, set foundation with Mineralize Skin Finish Natural.
9) For blush, he used Pinch Me with 187 (I think)
10) For that dewy, shimmery look, he used the Hush Cream Colour Base and 252 brush around eye, cheek area, in the "inner-v" and anywhere else where a bit of dewy shimmer is desired.
11) Primed eye area with Painterly Paint Pot
*This is where it gets tricky*
12) For the eye area, he basically used the Classic Eyes Palette from the MAC 2008 Holiday Collection. He used the shimmery gold color as the highlight (224), and the light pink just above the crease, on the bone - he said if you're going to do a crazy look, bring it back down to earth by using a couple normal colors- 
13) Lined the waterline and under eye area with Minted Eye Kohl Pencil, and took the shimmery green from the Classic Eyes palette and with the 239, smudged the kohl pencil into the green shimmery color, for a color degradation. I think he even applied some of the eyeshadow to the pencil to help the color look gradual.
14) Using BlackTrack fluidline and the 266 brush, he applied thick black liner on the upper lash line, using small strokes inward, towards the lashes (sounds weird, but it makes lining a lot easier).
15) Sketched in the crease and a little above, a black line with BlackTrack. Then took a 219 brush and the black glittery color from the palette to soften the line a little.
16) Did something with my brows - I believe he used an eyeshadow with a liner brush and then brow set in clear.
17) For lashes, used prep+prime lash, waited for it to dry, and dazzlelash mascara on top.
18) For the lips, he used Viva Glam IV (from the Holiday Viva Glam palette) - no lipliner- and Identity, the new sparkly pink lipgloss from the Monogram Collection - a pretty bubble gum color. 

So I think that was pretty much it, here are some more detailed photos of the look. I was so impressed by his work, especially this eye look, because it takes some talent to get the lines looking so perfect and uniform! 

There was another model done by a regional trainer, who had a more everyday, pretty smokey look using Blanc Type (highlight), Saddle (brow bone), Swiss Chocolate (inner and outer corners) and Beauty Marked (a bit over the Swiss Chocolate). It was so pretty! And for the lips, they used Stripdown l/l, Gell lipstick and Nice Buzz plushglass. She used a sheerspark pressed powder on the face, around the outer area of the eye. It was really beautiful and like I said, ideal for an everyday look. 


Anyways, it was so awesome, I'm glad I went and umm I definitely don't want to clean my face tonight! :)
HERE ARE SOME MORE PHOTOS OF THE LOOK BY VICTOR:
Photobucket

Photobucket

Photobucket

Photobucket

Photobucket

Photobucket

Friday, November 21, 2008

FYI: Base for Metal-X?

Ok, so one of the biggest mysteries regarding the MAC Metal-X shadows is what sort of base to use. There have of course been rumors that Liquidlast Liners work well, although multiple MAC artists have refuted that claim. Another artist claimed that they could be used without a base, since they were somewhat of a base themselves. I decided to put them to the test. Today on 1 eye I wore absolutely no base under my Metal-X, Gold Spice. On the other eye, I used Urban Decay's Primer Potion (review coming soon!). Although MAC paints have also been recommended, I chose UDPP because it is rather drying, and not creamy at all. It is also a thin base, which is ideal for these creamy shadows. So, which one was best? See the results below:


Left eye: No base. Right eye: Urban Decay Primer Potion
Photobucket
Photobucket

Aside from the shadow on one side of my face, the side with the UDPP as a base clearly experienced less creasing and fading. Both eyes tended to fade throughout the day, but without a base, why even bother if it's going to look like that?

You may be wondering how long I wore this look. I applied my makeup (albeit rather hastily) at 9am. I took this photo at 7:15pm, after a long day at school, walking strenuously for about 1/2 mile, and running multiple errands, including shopping, all while feeling mildly stuffy from our temperate fall weather! So I wasn't just laying around today, but even still, I usually expect my eyeshadow to stay on a little longer. 

I have good intentions to try MAC paints & paint pots tomorrow to see if they're any better! But now you know, a base is a good idea! :)

Thursday, November 20, 2008

Review: MAC Metal Urge

Photobucket

OMG I can't tell you how long I've been waiting for the new
MAC Metal Urge collection to come out! I know I'm like the only one who cares about this collection, but I have honestly been so excited to see these newly reformulated Metal-X, especially after last year's didn't work out so well. Today finally came I'm so happy! Anyways, here's a review, complete with photos of what I got:

Metal X:

Gilded Ash: Looks a lot like Smoke & Diamonds from MAC Starflash collection. Looks kind of brown in the pot, but applied, looks like a brown-gray. Very pretty!

Photobucket
^^
Pink Platinum: Very very light pink, especially when applied to the skin- almost looks silvery blue pink, which is probably why "Platinum" is in the name. Seems like it would look awesome underneath pretty much any color! 

Verdigris: Kind of looks like a dirty gray green. Not really my favorite.
Photobucket
^^
Gold Spice: Amber Lights eyeshadow in Metal-X. Very pretty, repeat from 2007's Metal-X collection. 

Material Gold: Beautiful nude champagne color. If you're going for a nice, everyday dab on the lids, this would make them look lovely and dewy! I am second guessing this one!

Photobucket
^^
Forged Rose: Lovely rosy copper color. Similar to coppering with a bit more rose to it.

Photobucket
^^
Metal Blu: This was another repromote from last year, and is so beautiful! I couldn't resist picking it up! I'm not a "blue" person but this with Reflects Duo Purple is amazing! Looks like ice!

SWATCHES: 
Photobucket


Pigments:
I like Pigments but I didn't see any that stood out to me. Gold Mode looks like Honey Lust in pigment form. Spiritualize is a beautiful yellow-green, if you like greens. Cocomotion is pretty too, but again wasn't anything special.

Glitter:
reflects duo purple

I intended to grab Blackened Red Glitter, but wasn't too wowed by it when I saw it in real life. It's not very shimmery, just dull blobs. I might consider it in the future but not for now. I ended up with Reflects Duo Purple Glitter, which looks so awesome and complements Metal Blu Metal X. I was sold on it as soon as I saw it layered. The pink glitter is fantastic as well. Finally the bronze looks like a dark gold - wait, isn't that bronze? haha.

Liquid Last Liners:
Most of these are permanent colors so they're not too special, but Visionaire is a nice light pink that was promoted with Barbie Loves MAC, so that's definitely a highlight. I passed on these because I don't care too much for these liners. I was hoping for the Glitter Liners again this year, but no such luck!


Overall Score: 4.5 of 5 
This collection would have been better if it had included Pink Ingot from last year's Metal-X collection, and Glitter Eyeliners, but what was provided was very impressive. The new formula for the Metal-X is impressive and noticeable. I have been wearing these on my hand for the past 5 hours and they haven't smudged at all! It's a good sign for my eyes. Great job, MAC!

Tips: Glitters are not eye or lip-safe, but can be used in hair, cheeks, etc. For the Metal-X, no base is needed, as these act as a base themselves. If you insist, my lovely MA recommended MAC Bare Canvas Paint (Urban Decay Primer Potion would work well also). Metal-X are also best applied with fingers, using a small amount of product.

Monday, November 17, 2008

Review: Bare Minerals Hydrating Mineral Veil


Imagine how excited I was to find this
Bare Minerals Hydrating Mineral Veil at Ulta, after finding it was sold out on both sephora.com, and at my local Nordstrom! I had to grab it, since apparently everyone else seemed to be quite fond of it. 

Their description is: 
"Bare Escentuals Hydrating Mineral Veil contains a unique, water-based, 100% pure bareMinerals formula that infuses thirsty skin with a cooling softness and subtly brightens for the ultimate, translucent finishing touch. Completely sheer, it lightly hydrates with natural ingredients while gently absorbing oil and minimizing the appearance of fine lines and pores. Buff it over makeup or bare skin with the antibacterial-treated Hydrate & Brighten Brush for a fresh, airbrushed complexion that lasts all day long." - sephora.com

The set includes a .21oz jar of this lovely Hydrating Mineral Veil (HMV), as well as a special Hydrate & Brighten brush created specially so you don't get mildewy brushes - because the HMV is water-based, the brush is coated with some special junk and can only be used around 100 times before it needs to be tossed. 

I have dry skin and find the regular Mineral Veil to be a bit drying, so I was really excited to try this hydrating version!

So what did I think?

When I first applied the HMV, I immediately felt a surge of cool moisture hit my skin! It's a nice sensation, very soothing for dry skin! Every application feels the same way: nice and cool! However, as I blended (or "swirled" in BE terms), it made my skin look shiny and oily! There's a good deal of shimmer in this product- most likely to counterbalance dry, matte skin- but it made me look like a grease ball! I had to use a bit of regular MAC face powder to try and correct the look. :( Furthermore, I felt after a bit of wearing it that it made my skin just as dry as before, as water-based products tend to do. After wearing it for a day, my skin doesn't feel super dry, but it also doesn't feel super moisturized.

Although this product has good intentions, it left me expecting a lot more. I love applying it to feel the cool sensation - that is fun! But the cons outweigh the pros- even having a disposable brush isn't exactly enticing. I will try this again before totally ruling it out, but so far no go! 

Score: 2 out of 5

Photos:


This is to show size as compared to the normal Mineral Veil. Very insignificant difference in size!


Hydrating Mineral Veil


Special Hydrate & Brighten Brush

P.S. - If you LOVE this (like most people), you'll be happy to know that due to its popularity, the product will be permanent as of April 2009! In full size containers!

Sunday, November 16, 2008

Urban Decay 24/7 Liners Pt II


Ok so the last time I showed you these cute Urban Decay 24/7 Liners sets, I only had the basic Velvet Rope set, so today while at Ulta (brand-new, just opened relatively close to my house!), I ran across the colorful VIP set and well, I couldn't resist. Look at those beautiful, bright colors! Are they calling your name like they are mine? 


L to R: Zero, Lucky, Covet, Electric, Lust


B-E-A-utiful!

As mentioned before, these sets are only $29 each, and each pencil is 3/4 the size of a normal, full-size pencil. Since a full-size one costs $16, you're getting 5 cute, compact pencils for a song! 

I'm posting swatches and photos of the Velvet Rope to remind you of its awesomeness as well! :)


Cute packaging = Great Stocking Stuffer!

Colors from L to R: Yeyo, 1999, Zero (most popular!), Bourbon, Stash


These are available at Sephora, Ulta, Urban Outfitters and other fine Beauty stores, so keep an eye out for them! 


As a side note, here are some things planned for the next couple of weeks:
-Contouring- as learned from MAC trainer
-Make Up Forever Concealer 
-Harajuku Lovers Perfumes
-Urban Decay Primer Potion
-Bare Minerals Hydrating Mineral Veil
-MAC Metal Urge and Monogram Collections
-...and much more! 

It's all coming up soon on Quack's Passion Pit! :)

FOTD: Neutral, Everyday + MAC Makeup for Dry Skin! :)

I apologize for the semi-long hiatus, it's been crazy! I've got a lot of great stuff in store over the next couple weeks for you, so bear with me!  :)

Yesterday I had the chance to go to a really fun event at Nordstrom for MAC Cosmetics. Their regional trainers were in town, and I was able to have a consultation with one of them, named Molly, who helped figure out an ideal daily makeup regimen that would work for me. Then, one of the makeup artists at our counter did the look with the recommended products, and I helped out by doing some of the work so I could learn how to do it at home. The look is fairly easy, but it was still very helpful to be tutored a little! I got to ask a lot of questions and learn a few tips and tricks from her, so it was awesome.

I thought I'd share the look via this Face Chart that I re-created when I got home. It's my first face chart EVER so I'm sorry that it's messy! Not to mention it got a little damaged during the makeover! :0(

This is a really easy, neutral, everyday look that can be vamped up for evening! I love colorful looks, but I wanted to try something a little softer.

Here's the look:


Products Used:

Eyes:
-Painterly Paint Pot (using circular motions, buff on with 217 brush- this uses less product, prevents creasing, and blends well)
-Shroom Eyeshadow (on brow bone, buffed on lightly with 217 brush)
-Orb Eyeshadow (lightly patted on lid only with 239 brush)
-Tete a Tint Eyeshadow (buffed through inner and outer crease with 224 brush)
-Smolder Kohl Liner (applied using small strokes with 208 brush on upper and lower lines as well as on rim/waterline)
-Zoom Lash in Zoomblack Mascara
-Brow Pencil in Lingering (fill in lashes with small strokes)
-Word of Mouth Trio from Red She Said (using the gray portion, apply with 219 under eye, to create a smokey look)

Lips:
-Prep + Prime Lip (described to me as like double stick tape! Used on lips and just around edges to prevent feathering)
-Stripdown Lipliner (although used only on edges, I recommend using on WHOLE lip so color stays in all areas not just the line)
-Freckletone Lipstick (I used Blankety for this face chart- they're pretty similar)
-Cushy White Plushglass


Face:
-Warm Soul Mineralized Blush (applied with 168)


Foundation:
Because I have such dry skin, Molly recommended some pretty moisturizing products. She recommended the Select Tint SPF15, which unfortunately is being discontinued and they were out of my color at the store. It is basically a tinted moisturizer, so I doubt if I have problem finding one from another brand, but she said minimal coverage is really all I need. Then, she used Select Moisturecover Concealer to cover any under eye circles and blemishes. Finally, she used Mineral Skin Finish Natural in Light Medium and spritzed the final look with Fix+. I love this-it not only allows my skin to feel nourished, and moisturized but it looks great and natural, not overdone.

So that is pretty much all I have for now - stay tuned for tips on contouring straight from the experts! It may surprise you! :)

As a bonus, here is a photo of my haul (good thing I had most of the products used, as I would've spent at least $500 if I hadn't!):

Saturday, November 8, 2008

FYI: Shelf Life of Cosmetics?

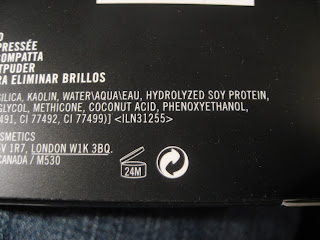
I love collecting cosmetics, and sometimes I get caught up in how pretty certain products are to worry about them expiring eventually. It's not fun to think that something we love so much could possibly have a shelf life! Of course this always brings up the age-old question: "What is the shelf life of ____?" There are a myriad of different answers for different cosmetics; for example, some people will tell you to throw away mascara at 3 months, others at 6. So which one is it? Cosmetic manufacturers have now come up with a great way to help you gage how long your product should last before it gets the boot. On the boxes of products or the product itself, they have simply added a small jar-like symbol with a number inside the symbol to tell you how many months it is recommended to be used after being opened. Here are some from a couple MAC products:

Mascara: 6 months


Prep + Prime Face: 6 months


Blot Powder Pressed: 24 months

These are found on many other beauty products like shampoos! Now, if I only knew what some of those other symbols meant! :) 

So, what happens if a product doesn't have this symbol on the back? Many MAC products, such as lipsticks and eyeshadows don't have the symbol, and the best way to gage their expiration is Sight, Smell, Touch. 

Sight: Does the product look mildewy, extra-runny, hard and/or shiny when it's not meant to be? Is the texture unusual?

Smell: Does it smell super waxy, rotten, or beefy (gross I know!)? Is it just foul smelling?

Touch: Is the product not applying the same? Is it abnormal in any way?

Answering these questions should tell you whether a product is still safe or not. To be honest, most products without the symbol either don't expire or last a long time, provided they're kept clean and sanitary. My first MAC lipstick was purchased in 2003, and guess what? Five years later, it is still totally fine- I will use it until it starts demonstrating expiree symptoms. I also have eyeshadows from the same time and they are in great condition. Generally, powder products that have not been exposed to oils and/or moisture never really expire. Keep your brushes dry and clean, and all your products in a non-humid spot, and you can rest a bit easier. But remember! Determining whether a product is safe to use is up to YOU. No one is responsible for the care of your products except you, so what may work for one person may not work for another, especially considering environment and other factors play a huge role in the care of cosmetics. 

So, you may also have cosmetics with the symbol on them, but you think, what's the big deal if I keep them a little longer than they say? Maybe you don't use your foundation everyday, and by 24 months, it's still half full. Again, follow the Sight, Smell, Touch guidelines and if it's not showing any signs of decay, use at your own risk. Most of these products that have the jar symbol expiration are products that can easily get contaminated because they are liquid, they're exposed to oils (like face -> brush -> powder), or bacteria (mascara). Those guidelines are fairly generous and are there as a courtesy for your health and safety. Cosmetic companies are not legally required to have products/ingredients approved by the FDA, nor are they required to place an expiration date on products, but they do to keep us healthy. If it were me, I'd probably still use a product past its date (EXCEPT mascara! Not worth it!), but again, it's up to the individual to make that decision.

I hope this entry has helped you learn a little about what's fair game in your cabinet and what needs to be tossed! :)

For other great tips, check out Specktra.net's FAQ on the subject! 

Friday, November 7, 2008

MAC Holiday Gift Sets: Coral Lipglass/Lustreglass


I know I know, I thought I was done with the MAC holiday collection, but they just "happened" today when I was at the counter picking up the new Dazzlelash mascara. Oh well! The coral lips are fabulous! The collection consists of 5 lipglosses: 2 lustreglass and 3 lipglass. Some of these are permanent, others are repromotes of formerly popular colors- basically they are all beautiful, especially if you love corals and pinks! Anyways, here are the colors as pictured from left to right and a short description: 


Budding: A pretty, sparkly mid-tone pink lustreglass with a fibre hair wand. 
Pink Grapefruit: Just as the name implies, a deep coral lipglass.
Wonderstruck: A lighter pink lustreglass than Budding. 
Underage: A pink nude lipglass with little shimmer. Great substitution for Myth or Fleshpot lipstick- if you like that nude look but don't want it as intense or satin, then this is a nice product to try! 
Ola Mango!: Orange-y coral lipglass- comparable to Miss Dynamite dazzleglass but a little lighter and less glitter!

Beautiful colors! For $29.50, this is a great deal that should not be missed! 

Review: MAC Dazzlelash Mascara


MAC lovers rejoice! A new *permanent* MAC mascara has been delivered! MAC mascaras have never been #1 in the mascara world, but with MAC's promise for Dazzlelash to "go bigger, bolder, longer", maybe we'll be hearing a few more raves soon? I picked up "DazzleBlack" today, and here are some photos and thoughts:

First, I love the fact that MAC's mascaras are so affordable. Dazzlelash is $12, and that's at the higher range of MAC's mascaras, which range from $10-12. Seriously, drugstore brands are almost the same price, so for a couple bucks more, why not go MAC? Besides it's affordablity, Dazzlelash is packaged in a unique tube akin to MAC's prep + prime line, with shimmer embedded into the black plastic.


The wand looks like a boring ol' mascara wand, but the results are fascinating (oh and sorry it looks grey, I used a flash! It's supposed to be black). It's much smaller than a lot of MAC's mascaras, particularly the Plushlash, which has a huge wand. This allows for the product to be applied more precisely, depending on YOUR preference. More control for you = good. 

I like that this mascara really does deliver on all of its promises to make lashes more voluptuous. In fact, the MA said it has already become her favorite MAC mascara, as some mascaras focus on just length or volume, not both. 

In these photos, the MA applied Dazzlelash to both my upper and lower lashes. I'm not a huge lower lash fan, but you can see how the bottom lashes fan out with the mascara! Genius! 

On the down side, there does seem to be a slight amount of clumping. My upper lashes are one thing, because I was wearing a teeny bit of mascara before the MA applied, but the lower lashes have no excuse, because they were previously mascara-free! So I will try again tomorrow and see if there's a lot of clumping or not.

PS- Here's my favorite way to apply mascara: Apply mascara first to the root of the lashes and wiggle the wand back and forth, and then brush it out to the tips. The tips should not be clumpy, and you shouldn't apply a lot there, just a little bit. The most concentrated bit should be at the roots! Enjoy Dazzlelash! 

Review: Sonia Kashuk Bent Liner Brush


Every woman knows how difficult liner can be to apply. There are many types of liner brushes that have been developed to make the process easier, but do they really do the trick? Sonia Kashuk offers this Bent Liner Brush, claiming to make the application of gel/liquid liners a lot simpler than you think. Many makeup gurus swear by this brush, such as Youtube's Makeup Geek. So does it pass the test? I picked one up at my local Target and tried it out. Here are my thoughts.

LOVE: The price is very appealing, as the brush costs a mere $5.99, so I felt it was definitely worth trying, even if it didn't work like I'd hoped. The hairs are very thin, so the brush is ideal for gel liners, which tend to be heavier, thus giving the brush some weight and control. I love the fact that it is bent, so you can hold it diagonally to your face and apply the liner in a much more comfortable, thus more accurate, fashion. 

DON'T LOVE: If you're looking to apply your liner really heavily and quickly, this brush may not be right for you. It takes a few coats to get the liner looking intense, so if you're in a hurry, you won't be happy. Additionally, the brush feels very cheap, which is probably why it's $5.99. It's made of really bad quality plastic that feels like it's going to snap or fall apart if I put it in a makeup bag with other cosmetics that are sloshing around. Finally, I wish this brush was sold online, but alas is only available at Target stores. 

OVERALL SCORE: 3 out of 5
Innovative and effective for lighter looks, for others, stick with your old liner brushes. 


Thursday, November 6, 2008

The other Makeup

As much as I love makeup, I'm deciding it's probably not wise to spend all my money on makeup...otherwise I'd go naked! Clothing is also important, and if you can get a deal on the clothing, it's even better! One of my favorite sites not only tells you where to find the best online deals for my favorite clothing brands (think Marc Jacobs, Michael Kors, True Religion), but they send the deals right to your e-mail! Shop It To Me sends e-mails out at a frequency of your choosing, and they only send items that are IN YOUR SIZE so you don't fall in love with an item only to discover that all they have is a 0 or something! They allow you to pick basically any clothing brand- even Gap- and it just comes right into your inbox. As an added bonus, if you recruit 10 of your friends, you get a $10 gift card to either Starbucks, Banana Republic or J.Crew- the sponsors change from time to time. Now, I don't get anything for recruiting you today, but I do get the satisfaction of knowing that ladies and gents out there are finding cute, inexpensive things to go with their cute makeup! Happy Shopping!

Sign up for shop it to me: http://shopittome.com

Tuesday, November 4, 2008

Review: Sephora.com

With the internet becoming more widespread and developed every single day, it's easy to see why beauty experts Sephora have offer almost all their products online at Sephora.com. The site offers some interesting incentives for shopping on their website, particularly the "3 Frees": Free Shipping ($50 orders+), Free Returns and Free Samples (3) with every purchase. Sounds great, right? Let's see how good these free things really are:

Free Shipping (on $50 or more): Free shipping is extremely common on many sites today; in fact, it's a rarity to find a site that doesn't offer this incentive to it's customers. At Sephora, $50 worth of product is not hard to accumulate, and sometimes it's nice to stock up on a few faves if it means free shipping. The only problem with free shipping, is it often takes a while to arrive. Sephora.com uses UPS, so depending where you live, it can take up to 1 1/2 weeks for your order to arrive. I live in Utah, and it did indeed take that long for me to get my package. If Sephora used the post office, I have no doubts that delivery would be significantly shorter, so I have to question Sephora's choice of delivery. I know it means cheaper for them, but I'd be willing to pay a few extra dollars if it meant my order arrived a few days earlier. 

Score: 3 out of 5

Free Samples: For every order you place, you receive 3 free samples. And, if you are a Beauty Insider, you have the opportunity to get deluxe samples with your order as well. Samples can be primers, foundations, fragrances, moisturizers, etc. It's a great way to try out new products and add a little bonus to your order. You likely won't find this at many other online beauty retailers, so this alone is worth shopping at sephora.com. 

Score: 5 out of 5

Free Returns: Returns should never have a price. I believe all stores should have free returns, which is why this isn't that exciting to me. I recently returned a product to sephora.com. Their return policy states that it may take up to 30 days to process a return. Well, when my return still hadn't been processed within that 30 day window, I called sephora, and they said it could take up to 6 weeks! I received my credit within 5 weeks, but to me, this is a little long for a "free" return. It's free yes, but I had to worry for 5 weeks that my $100 return could have possibly gotten lost in the mail. Now, this may not be typical, but neither is it super convenient. I'd recommend planning on a s-l-o-w return when shopping sephora.com

Score: 1 out of 5

Overall Score: 3 out of 5
Analysis: Sephora.com is a friendly place to shop, and provides almost every desired beauty line in one place, but when shopping, forget about the "3 frees".

EDIT: Get 20% off at Sephora from Nov 6-10, by using code FF2008!

Monday, October 27, 2008

FOTD: Halloween + Cleopatra = Love


Well, since we still have two major holidays before Christmas, I figured I've gotten a little too ahead of myself, and so here I am, backing up a little to enjoy Halloween, which is in just a few days! 
The look I've chosen today is Cleopatra, inspired by MAC's Alexander McQueen collection, one that was released about 1 year ago. Now you will have to forgive me, because this was a spur of the moment thing I decided to do, so I have barely any face makeup on, so I'm sorry if my skin looks grotesque- believe me, it feels even worse! I need a shower. :) Anyways, here is the promo image I was going for:
And, here are a few photos of my rough re-creation: 


What I used:
(all are MAC products)

Eyes:
Otherwordly Paint Pot (McQueen LE)
Haunting Eyeshadow (McQueen LE)
Blacktrack Fluidline
Plushlash Mascara in Black


Lips:
Fleshpot Lipstick
Prr Lipglass

Face:
Fix+ over a bit of powder 
Solar Riche Bronzing Powder

Tips for Creating this Look:
-Try using a regular eyebrow pencil to first shape your eyebrows as desired. I made mine a little thicker than usual, and doing this first helps to figure out what areas need to painted.
-If you don't have the McQueen paint pots, paint pot in another color will create the same look. An eyeshadow over a paint pot will probably look fine, and allow you to even the color a little better.
-The original image calls for Masque lipstick- if you don't have Masque, you can try a mix of Viva Glam II and Myth, or like me, just use a fleshy color lipstick with a rosy/pink lipglass.
-Some dramatic false lashes would look STELLAR with this! I think I might pick some up, if I decide to do this for Halloween! :)


Saturday, October 25, 2008

MAC Holiday Palettes: Warm and Smokey

B-E-A-utiful! These two palettes were my choice faves for the holiday season, and so far I have created some sweet looks! I will be using these for the next couple of weeks to see how many awesome looks I can achieve.

Okay, first off, the warm palette. Colors are: Warm Suede, Grand Entrance, Real Drama, Gentle Heat, Well-Spiced and Sweet Joy.
 Anyways, this palette is AWESOME, it's so versatile, and the colors are just smooth and creamy- they apply really well. Below is a swatch of the colors on my hand:
The colors are all really complementary which is exactly how a palette should be. I don't know about you, but that's usually why I buy these- so I can have some quick and fun looks at my disposal. I used the greenish side for a "smokey" eye effect, and will post an FOTD soon of it! I can't wait to try the orange-red side, also!

And now, onto the smokey palette. Yesterday, I created a look with this palette, now here's a chance to show you what the palette looks like! I can honestly say that this one was initially the last palette I thought I'd be interested in, because it's got two common colors: Satin Taupe and Carbon. Surprisingly however, it has turned into being one of my faves!


All the colors are really smooth and pretty, and blend really well into the perfect smokey eye! Swatches:
In conclusion, both the Warm and Smokey palettes are awesome additions to your MAC collection, and definitely worth the $38! Happy shopping!